RPi for seamless Portable & Fixed Ops
Notes for a Headless Raspberry Pi Configuration for Remote and Portable Operations in a Mixed SDR and Conventional Radio Environment
Acknowledgements
George Z., KJ6VU – for providing a great writeup on packaging the IC7100 inside of the Ridgid tool boxes.
Julian W., OH8STN – for providing a great set of videos discussing several aspects of field communications and insight on how to integrate digital mode needs in field with the RPi SBC’s.
The work in this document compiles almost verbatim the writeups and videos provided by these two gentlemen, with minor adjustments based on personal preferences.
Introduction
TBD – Intro to project and rationale behind using an RPi
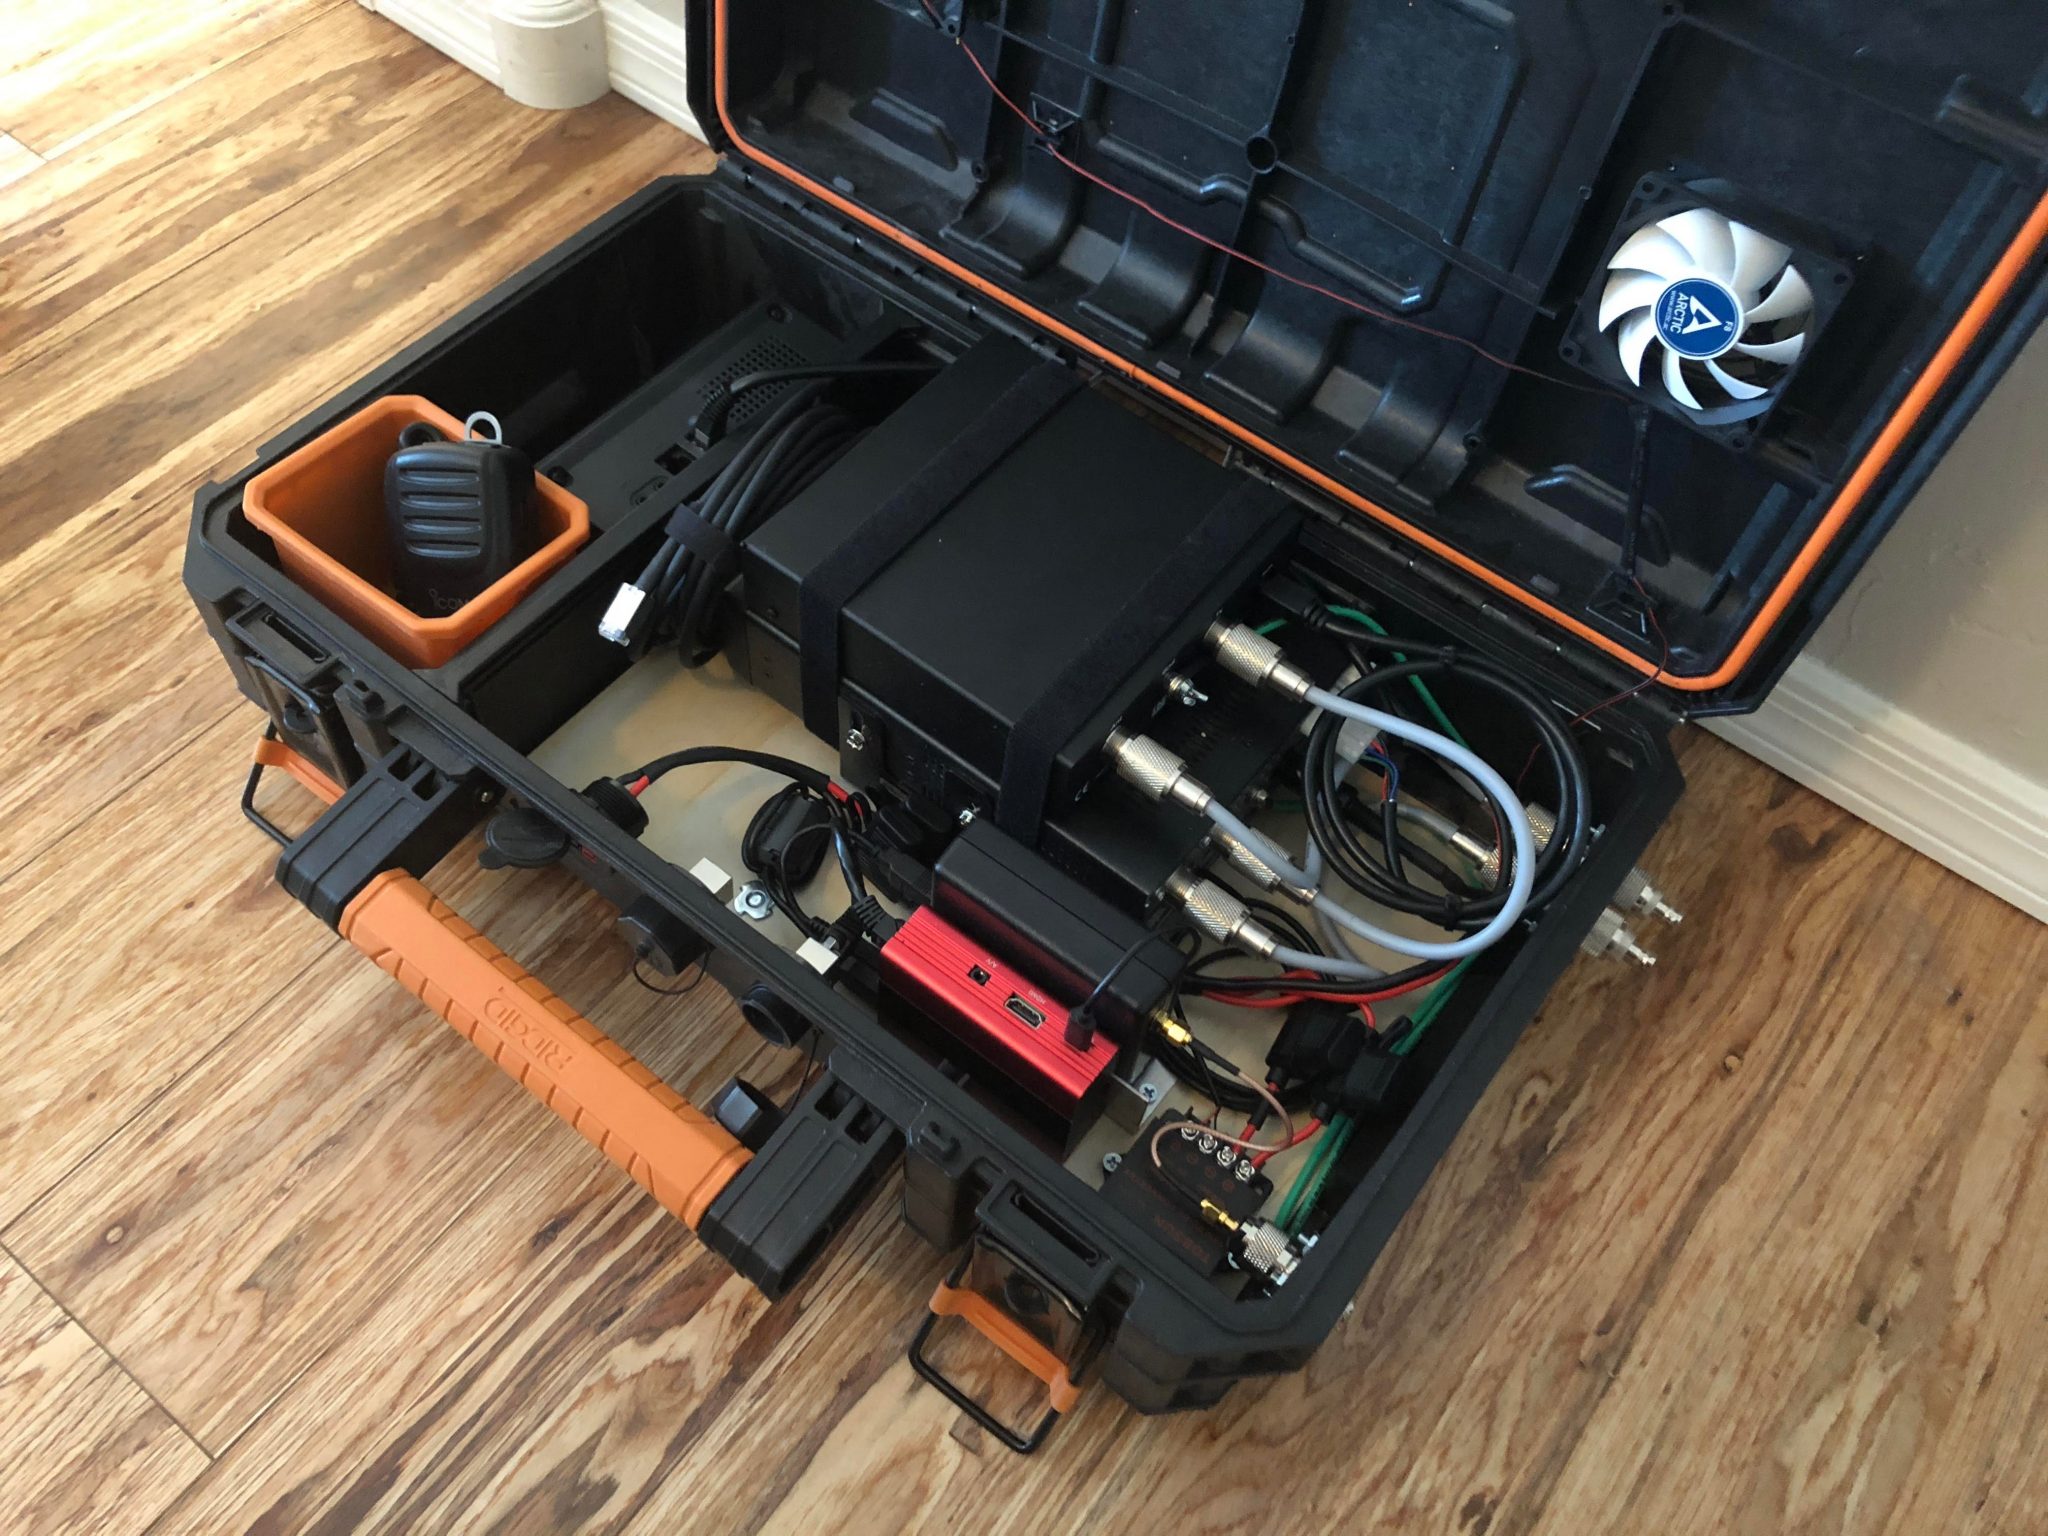
Physical Installation
TBD – Discussion on physical arrangement of go-box
Base Image
For starters, we’ll use the latest Raspbian image available for download here. This guide is written based on the June 2018 release of Raspbian Stretch with Desktop (R2018-06-27, v4.14 “Stretch”):
Imaged to MicroSD card using Etcher:
https://etcher.io/
First boot will ask you to select your locale, time zone, change the default administrator password, connect to a network and update the operating system to the latest packages. Once this is complete, you’ll be prompted to reboot.
Use sudo raspi-config to change the following:
- Change the host-name to your liking
- Set you console resolution to something useful, such as 1280×720 or 1920×1080 (this affects VNC)
- Enable SSH for remote administration
- Enable VNC for remote desktop (for mobile device use)
We’re now ready to configure the additional packages.
Additional Packages & Configuration
SoapySDRRemote
SoapySDRRemote is a layer that will stream SDR data over a network. Installing SoapySDRRemote is easy enough, however to use it with SDRPlay devices, we will need to compile a plugin to use with SoapyRemoteServer. We’ll start by installing the Raspbian drivers from SDRPlay, available at the following URL: https://www.sdrplay.com/downloads/
cd ~/Downloads/
wget https://www.sdrplay.com/software/SDRplay_RSP_API-RPi-2.13.1.run
chmod +x SDRplay_RSP_API-RPi-2.13.1.run
sudo ./SDRplay_RSP_API-RPi-2.13.1.run
Follow the instructions as prompted, reboot after the installation is complete. Next, we’ll install the SoapySDR server and utilities. We’ll then build the SoapySDRPlay plugin to enable the use of SDRPlay devices with Soapy.
sudo apt-get install soapyremote-server soapysdr-tools cmake
libsoapysdr-dev
cd ~/Downloads/
git clone https://github.com/pothosware/SoapySDRPlay.git
cd SoapySDRPlay
mkdir build
cd build
cmake ..
make
sudo make install
This installs the SoapySDR remote server and tools, and build and installs the SoapySDRPlay plugin. Next, well check to see if soapy can see the SDRPlay device by running the following command
SoapySDRUtil –findWhich should return something that resembles the following:
######################################################
## Soapy SDR -- the SDR abstraction library
######################################################

linux; GNU C++ version 6.2.0 20161010; Boost_106100; UHD_003.009.005-0-unknown

Found device 0
  default_input = False
  default_output = False
  device_id = 2
  driver = audio
  label = hw:USB Audio CODEC,0

Found device 1
  driver = sdrplay
  label = SDRplay Dev0 RSP1A 180300CB94
I do get some errors regarding the Jack audio server, which I’m ignoring since Jack is not installed. It does not seem to impact the SDR stream at all, so I’ve left it alone for now. SoapySDR should now be usable over the network by an appropriate SDR client such as CubicSDR.
USB Virtualization over IP
The VirtualHere (VH) USB server acts to pass traffic directly between a client computer and the USB ports of a server device over ethernet, creating a virtual set of USB devices on the client computer. This seems to work well; note that I was unable to get the SDR to work directly through VH (hence the use of SoapySDRRemote) with the RSP1a, which may be a bandwidth or latency issue. Regardless, VH USB is a very useful tool for connecting to devices attached to the RPi and seems to work well in just about every other device I’ve tested, including my Icom IC7100 transceiver which has a couple of serial ports and a soundcard interface handled through a single USB connection.
VH is not free software, however there is a trial mode that works for 10 days and will let you connect one device. If you want to tinker with a free solution, investigate USB-IP, otherwise VH is available for purchase for $49.00USD at the time that this was written.
Obtain the VH client for the computer you will be using the control the system. Obtain the VH server for ARM x32 devices here: https://virtualhere.com/ .
At the time that this was written, you can grab the server directly from your RPi using the following:
cd ~/Downloads/
wget https://virtualhere.com/sites/default/files/usbserver/vhusbdarm
you will need to give execute permissions and run the server as follows for testing purposes
chmod +x vhusbdarm
sudo vhusbdarm
Launch the client on your operating computer, punch in the IP address of your RPi, although the autoscan tends to work well if you’re on the same network, and you should be able to connect to any of the RPi’s USB devices at this time.
In my case, the VH server made the SDR unavailable to SoapySDRRemote as on several environments it blocks kernel access to the ports once it gets the devices ready to serve. I also did not want to server all devices plugged into the Pi as a virtual port. To fix the kernel access issue and button up the install, we’ll make some adjustments to the VH server and block all devices we do not want served over IP. In the client, right click and do properties for the devices you want enabled for remote access, note the manufacturer and product ID hex codes. Close the server by pressing ctrl+c. VH creates a config.ini file next to the vhusbdarm executable that we’ll modify:
sudo nano config.iniadd the following lines:
ServerName=K6DSA Interface Module
AutoAttachToKernel=1
AllowedDevices=08bb/2901,10c4/ea60
Press ctrl+o to save the file, ctrl+x to exit. The ServerName defines a name for the server to publish to the client and can be changed to whatever you want.
The AutoAttachKernel string tells VH to release the USB port to the linux kernel any time the port is disconnected from a client and is the actual fix for the SDR issue, it allows a device to be used by the local RPi system anytime it’s not remotely connected; this also comes in handy later on when we establish shared use between the transceiver’s sound card interface between VH and the SIP VoIP client.
The AllowedDevices string is for general housekeeping (and by itself also fixed the SDR block issue) and is included so that only the devices I intend to share over VH are displayed. The syntax is xxxx/yyyy,xxxx/yyyy,… where x is the manufacturer ID hexacode with 0x dropped, and y is the product ID hexacode with 0x dropped that were noted earlier, multiple devices are separated by comma. In this case, 08bb/2901 is the soundcard on the radio, and 10c4/ea60 is for the two serial ports on the radio. Explicitly listing the devices that you want to keep will force VH to ignore all devices not listed (you can also run this backwards by allowing all and explicitly blocking only certain devices, see documentation).
Launch the VH server again, and verify it works as desired and that your SoapySDRRemote devices work over the network with CubicSDR. Additional configuration options are documented here:
https://www.virtualhere.com/configuration_faq
If it’s all working, close the VH server and configure it to automatically start on boot.
sudo mv vhusbdarm config.ini /root/
sudo nano /etc/rc.local
Add the following line at the end of the file, but before the exit 0 string
# Amateur Radio USB Virtualization
/root/vhusbdarm -b
Note that the -b flag will launch the server in background mode. Press ctrl+o to save the file, ctrl+x to exit. Reboot and verify that everything’s working as expected.
SIP Client for VoIP (WAN connections)
While the USB sound card on the radio works well over a local network and is hands down the simplest option to use in a high bandwidth and low latency environment, and while it can work well over a WAN, it is sensitive to varying connectivity conditions. In this case, a SIP audio stream can be used – while the audio quality is not as good in comparison, it still works fine for voice and certain AFSK data modes (such as RTTY, FT8, FT8Call and PSK31).
SIP audio codecs are more robust in dealing with data stream issues related to low bandwidth and variable latency. On this setup, we’ll use the Linphone headless client to establish peer-to-peer audio streams and accommodate bi-directional WAN audio streams. Utilizing a SIP client has the additional benefit where audio can be patched to mobile devices such as phones and tablets or could even be integrated into other VoIP systems.
Start by installing linphone, then running and quitting the command line client as follows, which generates a configuration file for us to modify.
sudo apt install linphone
linphonec
quit
We’ll need to modify the configuration file that’s generated.
nano ~/.linphonercScroll through the file to where the audio codecs are defined, they will look as follows, and there will be several numbered sequentially:
[audio_codec_0]
mime=opus
rate=48000
channels=1
enabled=1
For each audio codec with an enabled=1 flag, change the line to enabled=0, except G.722. G722 seems to provide the best performance for voice and AFSK signals with very reasonable bandwidth requirements.
Run a command line instance of linphone using the linphonec command; place a test call from your laptop, phone, tablet, etc – answer the call by typing answer in the command line. On the other end you should be able to hear your radio’s audio, presuming you are not connected to the virtual USB device. Quit the command by typing quit, and modify the rc.local file to add the following lines at the end of the file, before the exit 0 string.
# Amateur Radio VoIP Modules
su pi -c 'linphonecsh init -c /home/pi/.linphonerc'
sleep 5s
su pi -c "linphonecsh generic 'autoanswer enable'"
Virtual private Network Server (Security)
Given that most of the services running on the RPi have no real security features built in, meaning, they’re wide open for anyone on the network, it’s important to provide some layer of physical security to the Pi. I’m OK with open access on my local network, however rather than opening up a set of ports through a router facing the internet, opening the corresponding services to a number of potential exploits, a VPN server is added to the RPi to allow for secure, remote use outside of the local network.
PiVPN is a project which makes this incredibly easy to install and is based on OpenVPN.
curl -L https://install.pivpn.io | bashThis will initiate the install process; a guided install walks you through every step along the way – note that the default settings tend to work just fine. Forwarding the default port of 1194 to the RPi IP address on your router will allow you to connect to the RPi using an OpenVPN client across the internet, and will let you treat the RPi as if it’s on your local network.
Once install is complete, you will need to generate client keys that the VPN client on the remote computers will use to authenticate.
pivpn addMobile Device VNC Access
TBD – Discussion on various apps
Field Hot-Spot
To easily use the software and service running on the RPi in the field, we’ll need to set up a wireless access point to connect to. Note that I am not using the wireless chip on the RPi to connect to a home network which is hardwired via Cat5 for performance reasons. We’ll use the HostAPd and DNSmasq services to this:
sudo apt install hostapd dnsmasq
sudo systemctl stop hostapd
sudo systemctl stop dnsmasq
HostAPd is used to establish an access point originating from the RPi; we’ll need to create a configuration file for it to use:
sudo nano /etc/hostapd/hostapd.confPaste the following:
interface=wlan0
driver=nl80211
ssid=K6DSA_FieldInterface
hw_mode=g
channel=6
wmm_enabled=0
macaddr_acl=0
auth_algs=1
ignore_broadcast_ssid=0
wpa=2
wpa_passphrase=FieldAccess
wpa_key_mgmt=WPA-PSK
wpa_pairwise=TKIP
rsn_pairwise=CCMP
ssid will be the name of the wireless network, you can change this to whatever you’d like. Similarly, wpa_passphrase is used to set the password of the network and should be changed as well. Save and close the file. We’ll need to tell HostAPd to use our new configuration file:
sudo nano /etc/default/hostapdFind the line that says:
#DAEMON_CONF=""And change it to:
DAEMON_CONF="/etc/hostapd/hostapd.conf"Note that the line has been uncommented b removing the hash sign. Save and exit the file.
Next, well modify the DNS Masquerading service to act as a basic DHCP server – the hotspot will not provide any routing or internet access, just a local network to use in connecting to the RPi (or any other devices that join it):
sudo nano /etc/dnsmasq.confPaste the following at the end of the file:
#Hotspot config - No Internet Access
interface=wlan0
domain-needed
bogus-priv
dhcp-range=192.168.1.100,192.168.1.200,255.255.255.0,12h
We’ll need to configure the DHCP client to assign a static IP address to the access point by modifying DHCPd’s configuration file:
sudo nano /etc/dhcpcd.confPaste the following at the end of the file:
nohook wpa_supplicant
interface wlan0
static ip_address=192.168.1.1/24
static routers=192.168.1.1
If you used the wireless chip in the RPi to connect to the internet during the initial setup of the RPi image, you’ll need to log into the desktop (either directly or via VNC) and disconnect from any WiFi network its connected to. The wireless icon should look like a pair of arrows, one point up, on pointing down for access point mode to be able to activate.
Update 4.21.19 – In a recent update of Raspbian you will need to configure hostapd to autostart. To do this, run the following:
sudo systemctl enable hostapdEverything should be set up at this point – we’ll need to reboot.
sudo rebootVerify that you can connect to the hot spot and are able to access the RPi hosted services, such as SSH, VNC and the VH devices.
SoapySDRRemote by default is not bound to the new interface. This is easily fixed by stopping the SoapySDRRemote service, manually starting and re-binding an instance, and rebooting
sudo systemctl stop soapyremote-server
sudo SoapySDRRemote –-bind
ctrl+c
sudo reboot
SMB Logbook Share
A number of the portable programs used via VNC will provide ADIF files for consumption by a logging program. On my laptop at home, I use Log4OM, in order to grant it access to the RPi’s ADIF files we’ll need to install and configure Samba (SMB). We’ll start off by installing SMB
sudo apt install sambaThen we’ll need to configure the Samba configuration file to create a share for logging and allow it to follow symbolic links (this will make sense later)
sudo nano /etc/samba/smb.confAfter [global], add the following to permit the use of symbolic links.
allow insecure wide links = yesComment out all [homes] [printers] and [print$] shares, then at the end of the file add the following to create the logs share.
[ADIF Logs]
  comment = ADIF Log Files
  browseable = yes
  path = /home/pi/logs
  guest ok = yes
  read only = yes
  follow symlinks = yes
  wide links = yes
Next we’ll need to create a folder for the logbook share to locate the appropriate files.
mkdir ~/logs/
cd ~/logs/
And then we’ll need to restart SMB to activate the revised configuration.
sudo systemctl restart smbdTo locate the log files in a single location yet also at the location required by each file’s respective authoring program, we’ll create symbolic links inside of the logbook share that point to each pertinent ADIF file. In my case, I added links for JS8Call, WSJT-X and Fldigi by creating the following from within the logbook share folder (~/logs)
ln -s ~/.fldigi/logs/logbook.adif fldigi_log.adi
ln -s ~/.local/share/FT8Call/ft8call_log.adi
ln -s ~/.local/share/WSJT-X/wsjtx_log.adi
After this you should be able to mount a share to your RPi’s IP address, with the standard username and password. The ADIF files within the share are resilient to deletion – that is, if you delete the log (such as within JS8 or WSJT) and it recreates, the symbolic links will update accordingly.
—

 Previous Post
 Next Post